How to Sew a Welt Pocket
 All sewers will agree: there’s nothing better than taking a piece of sewing fabric and a sewing pattern and turning it into a piece of clothing that you can actually wear, using nothing some thread, hand sewing needles, and a sewing machine. There’s just something so rewarding about retreating to your sewing room and making your very own garments; it’s also pretty therapeutic.
Table of Contents
What You’ll Need
First, you need to make sure you have all of the necessary sewing essentials on-hand. Set the following items out on your sewing desk (or whatever surface you may be working on):
- If you want the pocket to blend in, use the same material that the garment is made out of; if you want the pocket to stand out, you can use a different material
- Ruler
- Fusing
- Marking tool
- Shears
- The garment you want to add the welt pocket to
Step 1
Cut two rectangles out of the fabric you want to make the pocket out of. The rectangles should cover the width and length of the pocket.
Step 2
Cut two pieces of fusing. The pieces should be big enough to cover the opening of the pocket.
Step 3
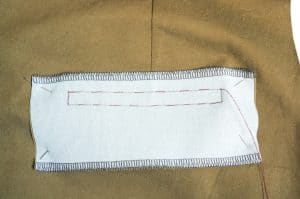
Draw two parallel lines on one of the pieces of fusing. The lines should match the width of the pocket opening, so you should consider how large you want the opening to be and use a ruler to mark out the lines.
Step 4
Pin the fusing to the wrong side of the fabric in the position where you would like the pocket opening to be situated.
Step 5
Place the fabric so that the unlined piece of fusing is facing down. Next, lay the second piece of fabric that has the lined fusing attached to is so that the fusing is toward you.
Step 6
Determine where you would like the welt pocket to be placed on your garment. Pin the fabric to the garment with the lined fusing side facing up.
Step 7
Using a straight stitch, sew across the lines that you drew on the top piece of fusing.
Step 8
Using your shears, cut a slit along the middle of the two lines; start cutting the slit about ½ inch from the start of the line and stop cutting about ½ inch from the end of the line. Next, cut a diagonal line that reaches the end of each of the lines you drew.
Step 9
Pull the fabric on the fused side of your pocket through the opening.
Step 10
Push the fabric back into the opening and you’ve got yourself a welt pocket.
Image: https://closetcasepatterns.com/sewing-welt-pockets-for-sasha-trousers/


