Brother Entrepreneur Pro PR 1000e Multi-Needle Embroidery!
Meet the Brother Entrepreneur Pro PR 1000e, one of the most advanced 10-needle home embroidery machines available. Discover a variety of time-saving tips and tricks for working with the PR 1000e, including how to anchor thread colors, change drivers, use the magic wand, and more.
Whether you’re a beginner or an experienced embroiderer, these instructions will help you get the most out of your PR 1000e. And if you still have questions, visit Brother for more information.
Table of Contents
Overview
Meet the Brother Entrepreneur Pro PR 1000e
In this article, I will introduce you to the Brother Entrepreneur Pro PR 1000e, one of the most advanced 10 needle home embroidery machines available on the market. This machine is perfect for those who want to take their embroidery skills to the next level and create professional-looking designs from the comfort of their own homes.
The Brother Entrepreneur Pro PR 1000e is a high-end embroidery machine that is designed to help you create intricate and beautiful designs with ease. With its 10 needles, you can work with multiple colors at once, saving you time and effort.
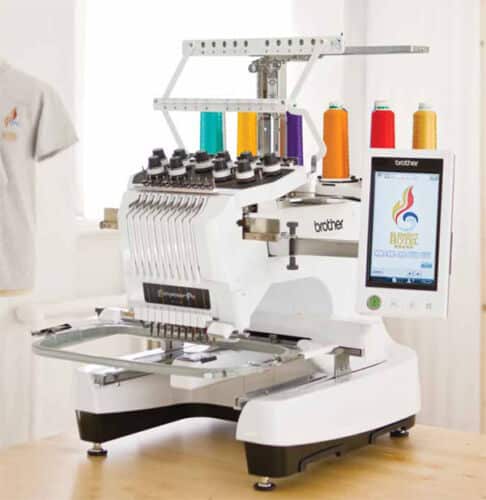
Plus, the large embroidery area of 14 inches by 8 inches gives you plenty of space to work with, allowing you to create larger and more complex designs.
One of the best things about the Brother Entrepreneur Pro PR 1000e is that it comes with a range of time-saving features that make it easier and more efficient to use. For example, you can anchor your thread colors, change the drivers, and use the magic wand feature to quickly and easily select and edit parts of your design.
Time-saving Tips and Tricks
Are you looking for ways to save time while working with the Brother Entrepreneur Pro PR 1000e embroidery machine? Look no further! In this section, I’ll share some tips and tricks that will help you get the most out of your machine and streamline your embroidery projects.
Anchoring the Thread Colors
One of the most time-consuming tasks when embroidering is tying off and trimming thread ends. With the PR 1000e, you can save time by using the automatic thread trimming feature.
However, to ensure that your embroidery stays in place, you’ll need to anchor your thread colors properly.
To anchor your thread colors, simply sew a few stitches in place before starting your embroidery design. This will secure the thread in place and prevent it from unraveling during the embroidery process.
When you’re finished with your embroidery, use the automatic thread trimming feature to cut the thread ends.
Changing of the Drivers
The PR 1000e comes with ten needles, which means you can use up to ten different thread colors in a single embroidery design. However, changing the thread colors can be time-consuming if you’re not familiar with the machine.
To change the thread colors on the PR 1000e, simply follow these steps:
- Stop the embroidery machine when it reaches the color change point.
- Raise the presser foot and remove the embroidery hoop from the machine.
- Use the thread cutter to cut the thread.
- Change the thread spool and insert the new thread into the machine.
- Lower the presser foot and resume the embroidery.
By following these steps, you can quickly and easily change thread colors without wasting time.
Using Magic Wand
The PR 1000e comes with a Magic Wand feature that allows you to quickly and easily select and edit embroidery designs. With Magic Wand, you can:
- Select individual elements of the design
- Move, resize, and rotate elements
- Change the stitch density and angle
- And more!
To use Magic Wand, simply select the design you want to edit and click on the Magic Wand icon. From there, you can use the various tools to make the desired changes.
By using these time-saving tips and tricks, you can get the most out of your Brother Entrepreneur Pro PR 1000e embroidery machine and complete your embroidery projects with ease. If you have any questions or need further assistance, be sure to visit the Brother website for more information.
Bonus Tips Brother Entrepreneur Pro PR 1000e
Anchoring the Thread Colors
One of the most frequently asked questions about the PR 1000e is how to anchor the thread colors. It’s actually quite simple.
All you need to do is tie a knot at the end of the thread and then insert it into the needle. Once you’ve done that, you can begin stitching. The machine will automatically cut the thread when it’s finished with that color.
Changing of the Drivers
Another question is how to change the drivers on the PR 1000e. This is also a very easy process.
Simply remove the driver that you want to change and insert the new one. The machine will automatically recognize the new driver and adjust the settings accordingly.
How to Use Magic Wand
The magic wand is a great feature on the PR 1000e that allows you to quickly and easily select areas of your design to edit. To use it, simply click on the magic wand icon on the design screen and then click on the area you want to edit.
You can then use the editing tools to make any necessary changes.
What are the key features of the Brother PR1000e embroidery machine?
What are the key features of the Brother PR1000e embroidery machine? The Brother PR1000e features an advanced Super View HD LCD touch screen by Sharp® Corporation that delivers crisp, sharp images, scanning and on-screen editing capabilities. It also includes 110 built-in designs, 28 size-adjustable fonts, and its InnovaChrome™ LED Thread Color System simplifies thread color setup and provides status indicators.
How many needles does the Brother PR1000e provide for its users and what is their purpose?
How many needles does the Brother PR1000e provide for its users and what is their purpose? The Brother PR1000e comes with 10 needles. This multi-needle feature allows you to set up various colors at once, making it easier to embroider designs that require multiple color changes without needing to change the thread manually for each new color.
